Appearance
Building Research Vault
Once Obsidian is installed, the next step is to build your Research Vault — the central workspace where you’ll document studies, organize code, track progress, and store project materials. This vault acts as your personal research hub, directly linked to your GitHub repository for seamless version control and collaboration.
Opening Your GitHub Repository as a Vault
If you already have a GitHub repository on your local system (cloned using GitHub Desktop), you can directly use that folder as your Obsidian vault.
In case you don’t have any previous repository for any project, we highly recommend that you use the repository template from [https://github.com/iitrabhi/project-template] to create your new repository. This ensures that you have a prebuilt organized structure and folders that will ease up the setup process.
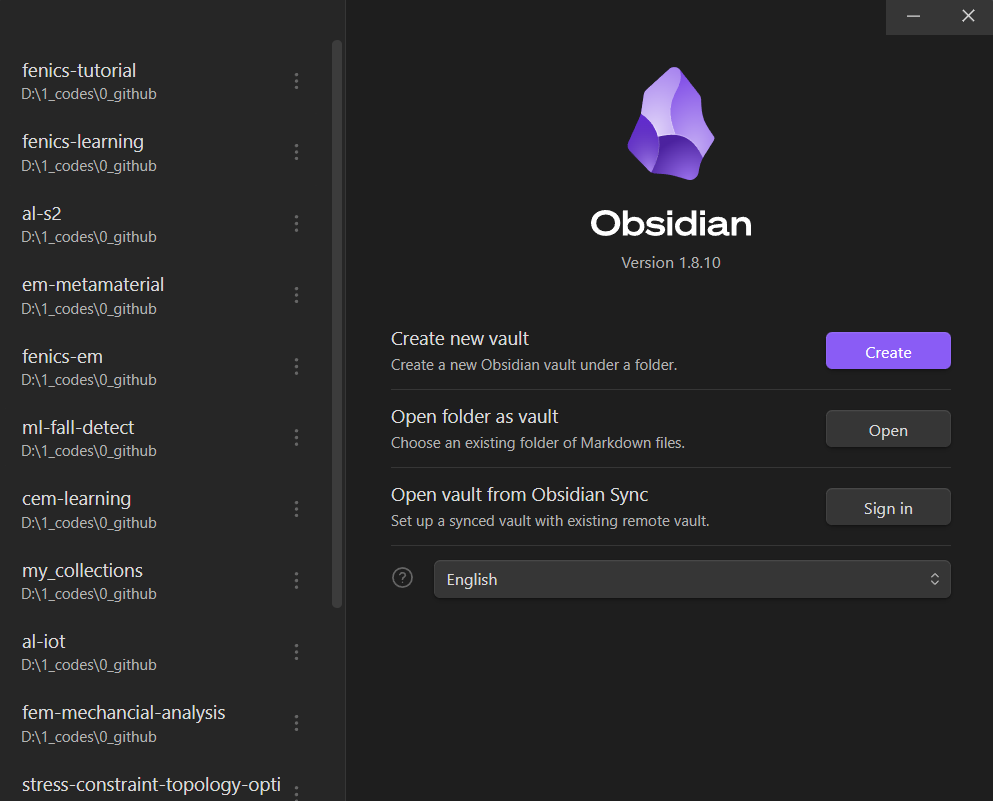
- Open Obsidian.
- On the welcome screen, select Open folder as vault.
- Navigate to your cloned repository folder (for example,
fenics-tutorialorsimulation-project) and click Open. - Obsidian will now treat this GitHub folder as a vault, meaning all your documentation, notes, and supporting material will stay version-controlled along with your code.
- Remember to use GitHub regularly to commit your changes and push them to the remote repository. This ensures your notes and code are always backed up and synchronized across devices.
This setup ensures that your technical notes, references, and results are always in sync with your codebase — combining documentation and computation into one unified workspace.
Basic Setup
When you open a repository for the first time, Obsidian will show several icons in the left sidebar. We’ll customize these to keep only the most essential tools visible for daily use.
Customizing the Sidebar
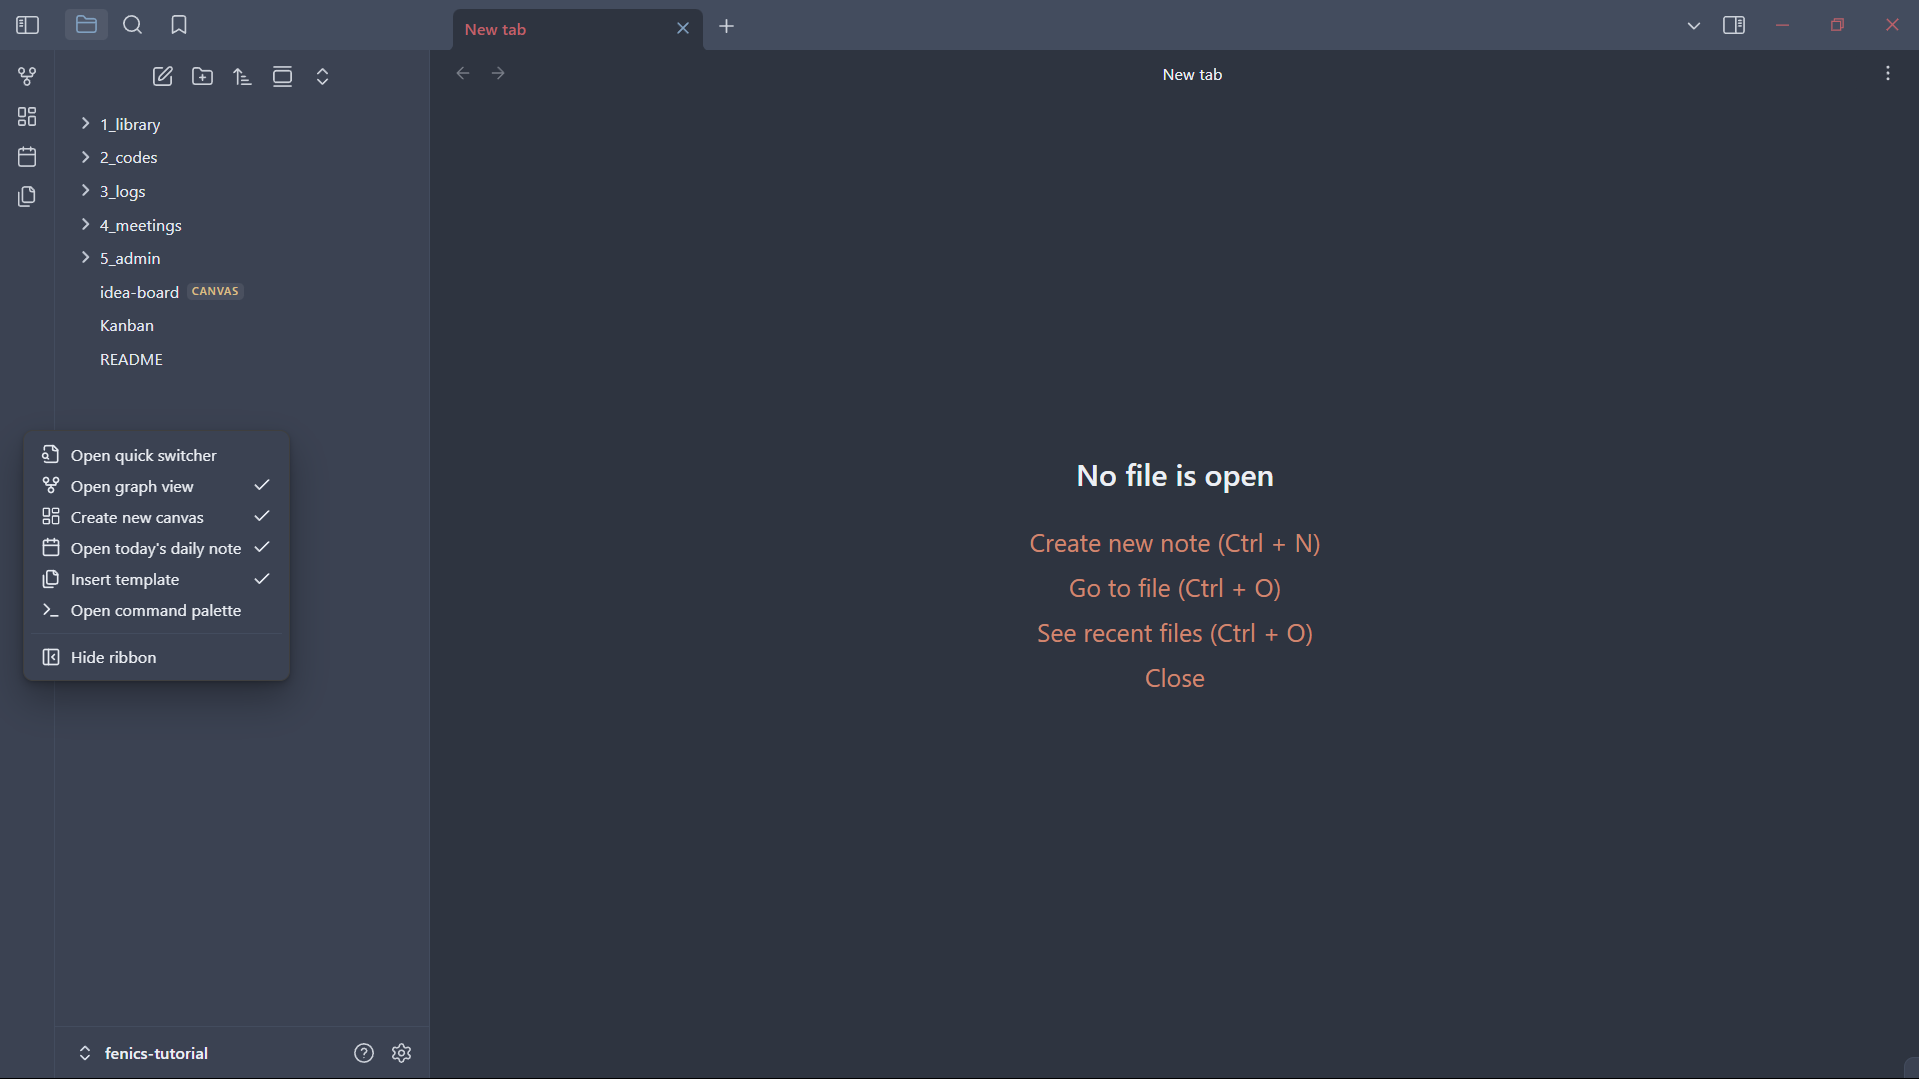
Right-click anywhere on the left sidebar to open the list of ribbon options.
You’ll see a list of ribbon options like Open quick switcher, Open graph view, Create new canvas, and others.
Deselect everything except for the following three items:
- Create new canvas
- Open today’s daily note
- Insert template
These are the only options you’ll use regularly for documentation and daily notes.
The following tools are optional and can be kept enabled when needed:
- Create new board – for creating Kanban-style task boards
- Open graph view – for visualizing connections and backlinks between notes
This minimalist setup keeps your workspace distraction-free and focused on writing and organizing.
Folder Structure Overview
Once your vault (GitHub folder) is open in Obsidian, you’ll see a folder structure like this:
1_library/
2_codes/
3_logs/
4_meetings/
5_admin/
Each folder serves a specific purpose in your research workflow.
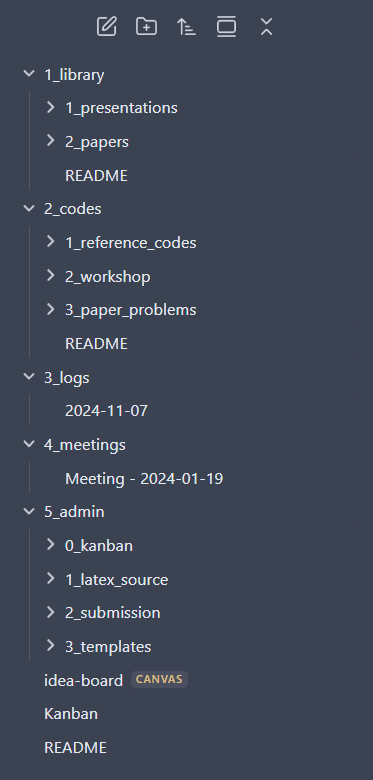
Note:
For every folder and sub-folder in your research vault, include aREADME.mdfile that briefly describes its purpose and contents. Regularly updating these files as you add, remove, or reorganize materials will help you and collaborators quickly understand the structure and intent of each section, making your vault easier to navigate.
1. Library
The library folder works like a digital knowledge bank — a space to store all your research papers, presentations, and reference materials. Think of it as your personal archive, similar to a physical library shelf where you keep every document that contributes to your understanding of the subject.
You can also create subfolders here, such as:
1_library/
 ├── 1_papers/
 ├── 2_presentations/
 └── 3_references/
This keeps your resources categorized and easy to access.
2. Codes
The codes folder is where all your programming and simulation work happens. It is divided into three subfolders to maintain a clean and logical separation between different types of code.
2_codes/
 ├── 1_reference_codes/
 ├── 2_workshop/
 └── 3_paper_problems/
1_reference_codes – Contains base or template scripts obtained from external sources (GitHub repositories, previous studies, or documentation). These serve as starting points for your projects.
2_workshop – This is your active development space. All current simulations, experimental scripts, and code files you’re working on go here. This is where you build, test, and iterate on ideas.
3_paper_problems – This folder is reserved for finalized studies or simulation codes associated with research papers or official publications. Once a study reaches publication stage, its relevant scripts and results are stored here for record-keeping and reproducibility.
3. Logs
The logs folder helps you track the progress of your projects over time. You can create dated notes to record what you worked on, key results, or milestones achieved. This serves as your personal timeline — useful for weekly reviews, reports, and retrospectives.
Example:
3_logs/
 ├── 2025-10-10.md
 ├── 2025-10-11.md
4. Meetings
The meetings folder is used to store notes from project or team discussions. Each note should include the date, attendees, main discussion points, and action items.
This keeps all meeting records centralized and easy to reference later, avoiding scattered notes across different apps.
Example:
4_meetings/
 ├── 2025-10-05_team_discussion.md
 ├── 2025-10-08_progress_review.md
5. Admin
The admin folder contains all administrative and organizational files related to your projects. This includes:
- LaTeX sources for paper submissions
- Templates for reports and documentation
- Submission tracking files or forms
Essentially, this folder acts as your project’s operational backend — keeping administrative materials separate from research content.
Optional Boards and Visualizations
You can also create:
- Kanban boards — for managing tasks or experiments visually
- Graph view — to see how your notes are interconnected through tags or internal links
These are optional tools that can be activated when you need a broader visual perspective of your vault’s structure.
Summary
You’ve now learned how to:
- Open a GitHub repository as your Obsidian vault
- Configure your sidebar for a clean, efficient workspace
- Organize your vault into folders for research papers, code, logs, meetings, and admin work
This structure keeps all aspects of your work — from raw data to published results — organized, connected, and easy to navigate.
In the upcoming chapters, we’ll explore how to use Obsidian effectively, including creating and linking notes, writing templates, and managing documentation across projects.